Follow this guide to install TensorFlow GPU on Windows (without the need to manually install CUDA Toolkit): https://www.pugetsystems.com/labs/hpc/How-to-Install-TensorFlow-with-GPU-Support-on-Windows-10-Without-Installing-CUDA-UPDATED-1419 CUDA will be installed for you automatically using Anaconda.
Or just follow the Fast Instructions I wrote below.
If you want to install CUDA toolkit on your own, or if you want to install the latest tensorflow version, then you need to follow official installation guide.
Go download and install Anaconda (with built-in python) from Google. (I know you can do it!) Then create a new conda environment using the following command:
conda create --name tf-gpu anaconda tensorflow-gpuIt will create a new environment tf-gpu with anaconda scientific packages (python, flask, numpy, pandas, spyder, pytest, h5py, jupyterlab, etc) and tensorflow-gpu.
Tensorflow is now installed. Open a new command prompt and type
activate tf-gpu
python
import tensorflow as tf
tf.__version__
You will see it is reporting tensorflow version. That's it!
Just make sure to always activate the environment using conda before calling any command. conda activate tf-gpu
Otherwise you will not be able to import tensorflow in your python code.
If you are working with Jupyter Notebook or Jupyter Lab, there are extra steps you need to do after installation of tensorflow.
Create tensorflow-gpu kernel for Jupyter Notebook using following commands:
conda activate tf-gpu
conda install ipykernel jupyter
python -m ipykernel install --name tf-gpu --display-name "TensorFlow-GPU"
If you have installed wrong ipykernel, you can remove it using jupyter kernelspec uninstall THE_KERNEL_TO_REMOVE
where THE_KERNEL_TO_REMOVE can be found from jupyter kernelspec list
Now when you launch your jupyter notebook or jupyter lab you will find that you can change your python kernel to TensorFlow-GPU on the top right.

- Check https://anaconda.org/search?q=tensorflow-gpu for the channel that released the latest version of
tensorflow-gpu. Supposeanacondaprovided the latest version, you can runconda install -c anaconda tensorflow-gputo install from anaconda channel. - Make sure that when you run python kernel inside Jupyter Lab/Notebook, only one instance of Tab is run at a time. Otherwise multiple tabs will try to access the GPU at the same time and cause deadlock problem (the program will freeze).
- If you cannot install a particular package using
conda, just usepip. - Right now, the latest version of
tensorflow-gpuprovided by Anaconda is 1.14. If you want to use tensorflow2.0 then you need to check the official installation guide, and manually install CUDA toolkit. Personally, I install both tensorflow1.14-gpu and tensorflow2.0-gpu in separate environments. (some old programs from tensorflow requires tensorflow 1) I also install tensorflow2.0 (CPU version) at the base environment for inference tasks. - I suggest you to stick with either
pip installorconda installfor each environment as it could cause dependency conflict if you use them interchangeably often.
ImportError: Could not find 'cudart64_100.dll'. TensorFlow requires that this DLL be installed in a directory that is named in your %PATH% environment variable. Download and install CUDA 10.0 from this URL: https://developer.nvidia.com/cuda-90-download-archive, fixed by activatingtf-gpuenvironment before launching Jupyter Notebook.
I got about 20x speedup using GTX 1060 GPU compared to my CPU i7-3770 @ 3.4GHz 3.9GHz. The GPU utilization was around 40%. The neural network architecture plays a very big part on how much speed you will gain. If your network is too small you won't gain any speedup. I tried with the simple MNIST model example on TensorFlow tutorial and the GPU runs roughly at the same speed as the CPU. That mistake made me thought that I installed GPU version incorrectly until I try LeNet-5 model and saw 20 times speedup.
To reproduce my result and make sure that your GPU is really working, run test_mnist_lenet5.py attached below for this benchmark. Uncomment os.environ['CUDA_VISIBLE_DEVICES'] = '-1' to use CPU. Or just activate the environment with tensorflow CPU.
You should see significant speedup.
You can do a comparable benchmark by following this guide: https://medium.com/@andriylazorenko/tensorflow-performance-test-cpu-vs-gpu-79fcd39170c
Make sure to checkout tensorflow/models repo on the tag that match your tensorflow version. E.g. if you install tensorflow 1.13 then use models at tag v1.13.0. If you checkout the master branch you might experience problem that the code does not run on GPU like I did.
I got around 6,000 examples/sec using GTX 1060 while only around 270 examples/sec using CPU i7-3770 (not compiled from source to use AVX instruction).
- Use Anaconda, instead of a combination of
python,virtualenv,pyenv, andpipenv. It's one simple program that roughly does everything those 4 things do. It allows you to setup multiple python versions in your system similar topyenv. It allows you to setup multiple environment likevirtualenvandpyenv. Most of all, it eliminates your headache. - Installing tensorflow without CUDA is just for getting started quickly. But after you want to get serious with tensorflow, you should install CUDA yourself so that multiple tensorflow environments can reuse the same CUDA installation and it allows you to install latest tensorflow version like tensorflow 2.0. Currently, the latest tensorflow GPU version on Anaconda is only 1.14.
- Depends on your need you might need to install multiple tensorflow environments. For me I install tensorflow1 CPU, tensorflow1 GPU, tensorflow2 CPU, and tensorflow2 GPU on 4 separate environments. (
tf1-cpu,tf1-gpu,tf2-cpu,tf2-gpu) - Install tensorflow 2 CPU (not GPU) on the base environment, so that it is quick to experiment a small model or test inference on CPU. TensorFlow GPU initializes slowly so it can be annoying when you want to test something quick.
Always install all packages again inside the new environment even if you can still access the package from the base environment.
For example, if you install a new environment tf-gpu, you will be able to reuse the python.exe from base environment. But this will likely cause problem later. So make sure that you install python again on the tf-gpu. (You can simply install anaconda package so that it install python and other related packages in one command)
This advice applies to other packages like numpy, opencv-python, pandas, scikit-learn, spyder, jupyter, jupyterlab, etc as well!
If you are using Spyder or Jupyter Notebook as your main IDE, it's very important that you install them on every environment you want to use the IDE. Because these IDE will be able to access the packages inside the same environment only. It will be quite troublesome to try to install one IDE instance and reuse it on all environments. (I tried)
You can check the location of the package that you have installed using where command e.g. where python, where jupyter, etc.
This will allow you to check if you have installed things correctly when you are faced with bugs.
This approach consumes more disk space but it will reduce your headache. If you don't have enough disk space, buy a new one or remove some of your junk files.
CPU Time on LeNet-5 MNIST

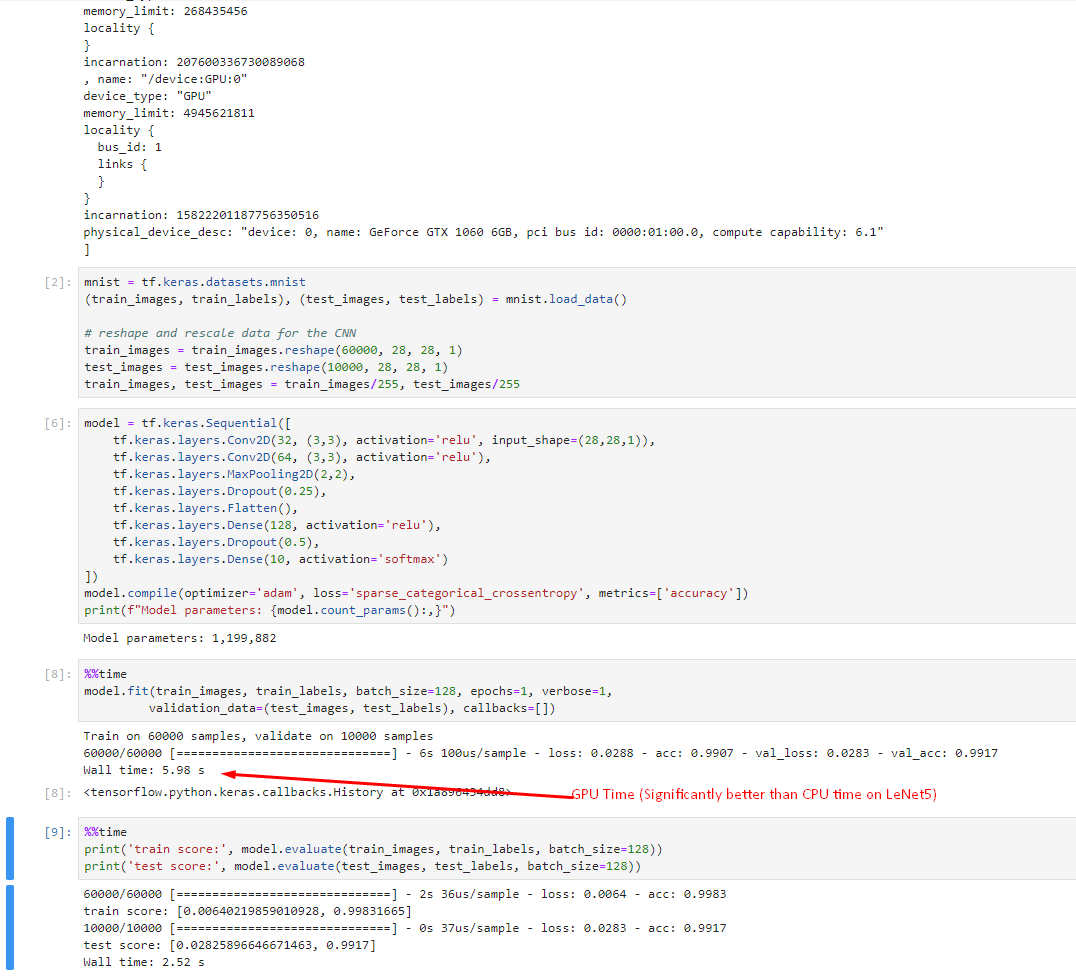
GPU Time on LeNet-5 MNIST